
Table of Contents:
These instructions will assume the following:
- You are already registered with SIGNiX with a notary user license.
- You have already setup your eNotary profile in your SIGNiX account – which includes uploading the image of your notary stamp.
- You have been through at least one Training webinar with our Success Team.
- You have a working knowledge of how to host and navigate a Zoom meeting.
If you do not meet these criteria, please contact us to discuss next steps: customersupport@signix.com
Document Preparation:
Login to your Dashboard, and then click on the "Create New Transaction" button found at the top right side of the screen.

The first step will be to add the Signers. For most notaries, the signers will be your clients, and any witnesses who also need to sign the document(s), plus the notary themselves.
Enter the first signer’s Name, Email Address, and then select an appropriate Authentication method for this person:
- Password Only authentication is for signers that you know personally.
- 2 Factor Authentication (Text Message) is a two-factor authentication option that notaries can use as needed for e-signature transactions, but likely not for RON - always check with your state's laws first.
- Knowledge Based Authentication (KBA) with ID Verification is the option that most states require when the notary DOES NOT personally know the signer, where the signer’s identity needs to be verified.
- ID Verify - Credential Analysis & Biometrics is another option when the notary DOES NOT know the signer.
- Please note that not all notary clients will see the same options, as these authentication methods will differ by state, per RON laws.
If you select the KBA option, you should then click the “Ask the Signer” checkbox so that the system will ask your client for their SSN and DOB.
Click the “Add Signer” button to add that person to the transaction.
Adding Signers:

The document(s) must be signed by each person going One at a Time, in the order they are listed here on this Signers screen. Keep this in mind as you add everyone, and place them in a logical order here.
If you make a mistake, you can adjust the order of the signers by dragging and dropping them on the screen, using the arrows at the far left side.
Repeat this step for as many signers need to be added, then see the next step for adding yourself. The notary must always be last in the order.

Virginia notaries will see a 4th authentication option, which is “Knowledge Based (KBA)” without the ID Verification. The state of Virginia allows notaries to verify signers with just KBA and not the ID, per their state RON laws.
If you are performing an In Person Notarization – where the client is physically present with you and able to show you their ID in person, then they sign electronically on a computer in your presence – then you can select the Email Only authentication instead of the KBA with ID Verification.
Adding the Notary:
As the notary, you will add yourself last in the order.
Click on the “Add New Signer” button then you will select these two checkboxes in this order:
- “I am the Signer”
- “Notary”
By checking these boxes in this order, the system will search for and display your Name, Email, and Notary Information. If everything looks correct, leave your authentication method as “Email Only” and then click the “Add Signer” button to add yourself as the final signer on the transaction.
If your name or email address shows incorrectly when checking these boxes to add yourself, please contact us to have this information updated: customersupport@signix.com

Think of a transaction like this: Who, What, and Where. On this step, we are adding Who needs to sign the document(s). A common question here is whether to add Witnesses as Signers. Ask yourself this: Does the Witness also need to sign the document? If the answer is Yes, then add the witness as a signer. If the answer is No, then do not add the witness as a signer, and instead you can invite them to join the Zoom meeting so they can just watch the signing take place later.
Adding Documents:
The second step is to add the Documents. Once all the signers and the notary have been added, click the “Next” button or the “Documents” tab at the top of the screen to move onto the next step of the Document Preparation process.
Click on the “Upload a Document” button, which will bring up a window allowing you to search your computer for a PDF document to select.
You can add as many documents as your client requires by repeating this step. We only accept PDF file type documents, as those are the most widely accepted. There is a 10MB limit for the file size of each document. Each PDF that you upload will be considered a “document” in the system.
When the transaction is completed and everything has been signed, you will be able to download each document individually or together in a folder. SIGNiX does not combine PDF files together during signing. If you upload 5 documents, for example, then you will receive the same 5 documents when the transaction is completed.
If you or the agency accepting the final documents would like to have them all combined into one PDF, you will need to do that prior to uploading the document(s) to the transaction. We do not recommend trying to combine, nor separate, PDF documents after signing has finished because any changes made after signing will invalidate the digital signatures.

Think of this step as adding the What – What will your clients be signing together? As the notary, it is up to you to include all necessary documents in the transaction. Keep in mind that you cannot take an already signed document and upload it into a new transaction for additional signing, as that would invalidate the original signatures. Now is the time to get everything and everyone added to the transaction.
Adding Signatures:
The third step is to add the Signatures and other actions to the documents.
Here you are going to place fields onto the documents to tell the system Where you want each signature, initial, notary stamp, etc. to show up.
This step is not you signing anything, it is still document preparation.
You will notice that the “Signatures” screen has two drop down menus at the top, allowing you to change between the documents you have uploaded, and the signers you have added.
Be sure to select the correct Signer from the right drop down menu as you begin to place fields onto the document. These fields will be color coded to help visually show you who they each below to on the page.

The first field you must place on the document, for each signer, is one Signature or Initial field, whichever your document requires.
The fields are all “Drag and Drop” from the task bar on the left side.
Drag and drop the Signature field for the First Signer onto the area of the document where they will need to sign. Each signature field will come with an automatic date field that is associated with it. The system will add the date and time of signing to this field once the transaction is complete.
You will see a Preview of what their signature may look like inside the field – this is not their actual signature yet, just a simple preview.
You can adjust the placement of the Signature field, and of any other field, after it has been placed on the document. Just click on it, then drag and drop it again as needed.

In the above image, the first signer has been given a Signature field on the document. This signer’s fields will all be color coded with a Green Outline.
You can adjust the size of any field by dragging the lower right corner of the field to adjust the length and height.
When you make a field longer in length, it will be able to fit more text inside, or a longer name. When you make a field taller in height, the text or signature inside will grow in size to match the height of the field.
This can be helpful to ensure everything is easy to read once the document is finished and ready to be reviewed. We suggest that notaries complete several Demo Transactions to test out what size of field works best for them and their documents – more on that soon.

In the above image, a text box has been placed for the first signer to fill in as an example. The size of the box was adjusted to be both longer and taller, resulting in a large rectangular text box field.
Here's a quick overview of all the icons on the Task Bar and what they can do:

Repeat the above process, by selecting the next signer from the drop-down menu at the top right of the “Signatures” screen. Give each signer a Signature or Initial first, then any other necessary fields they need to fill out on the document(s).
Be very careful about which signer is selected at any given time, or else you may assign a field to the wrong person by accident. Always double check your work and remember that they are color coded to help you.
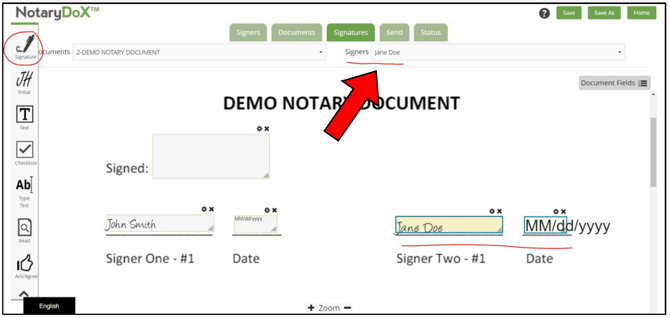
In the above image, the second signer has been given a Signature field on the document. This signer’s fields are now color coded with a Blue Outline, to tell them apart from the other fields.
When you reach the last signer, which is the Notary, here are the next steps:
Give the notary a signature field first, then you should see the “Read” icon on the task bar will turn into the “Notary” icon – see next image.
Drag and drop the “Notary” icon onto the document to place the stamp.
You can resize the stamp field the same way you resize the other fields, with the lower right corner. It will remain a rectangular shape even as you resize.
The system expects you to place the notary stamp immediately after placing the notary’s signature field. If you do something else between these two actions, move the date field for example, then you may get an error when trying to place the stamp. Don’t worry, just click on the signature field you already placed, so that it is selected, then you can place your stamp.
Add the Notary Stamp:

In the above image, the notary has been given a Signature field on the document. This signer’s fields are now color coded with an Orange Outline, to tell them apart from the other fields.
When you have more than one signer, not including the notary, then the system will ask you which signers are related to each notary stamp that you place onto the document. You won’t see this when there’s only one signer.
So not only is each notary stamp associated with one notary signature field, but the stamps are also associated with one or more signer on the document.
Just as in the paper world, your stamp is notarizing a specific aspect of the document, so you must select one or more signers for each stamp.

Keep in mind that this stamp field, like the signature field, is a preview of what the document may look like after signing has been finished later.
Once you have selected which signer(s) the stamp is associated with, you will be able to place other fields. Each time you place a signature for the notary, you will have the opportunity to also place a stamp.
It is up to each notary to determine what their particular document requires. SIGNiX cannot provide legal advice to clients about what they should or should not do with the document.

In the above image, the notary’s stamp field has been placed onto the document. This does not mean the document has already been notarized, this is still part of Document Preparation.
If you would like to pre-fill some of the text boxes on your document, meaning you enter text inside the box before signing has started, then you can click on the small gear shaped button just above the text box.
That button will bring up the settings for that specific text box.
You can type whatever you wish into the “Default Text” area of the settings, and then click the “Apply” button to place that text into the box on the page.
Keep in mind that you cannot edit any fields at all on a transaction after the first person has completed signing. So always double check your work for typos and other errors, then if a change needs to be made, it should be done before anyone has signed.

In the above image, a text box has been placed on the document, and then to edit the box, click on the small gear icon above it, shown here in the red circle and with the red arrow pointing at it.

In the above image, an example date has been typed in the “Default Text” area and then the “Apply” button is circled.

Send and Create the Transaction:
Every signer must have at least one task to complete on at least one document included in the transaction, and every document needs at least one task placed on it for at least one signer.
Once you have finished adding all required fields to the document(s) then you can click the “Next” button at the bottom right of the screen, or you can click on the “Send” tab at the top of the screen to proceed.
The last step of preparing a new transaction is to review the Send screen.
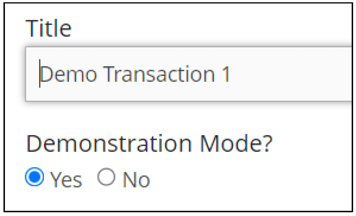
Here you can give the transaction a Title at the top. The system will make a default title which you can edit as you like, just keep it under 80 characters.
You can choose to put the transaction into Demonstration Mode or not – more on that next.
You can edit the default Email Message as needed.
You can choose when the transaction will expire and if reminder emails will be sent to your signers – most notaries do not need this, as they will be scheduling a Zoom meeting and staying in close contact with their signers.
You can choose if your signers can download the signed documents or not – some notaries want this so they can charge clients first.
By the “Send” button, you will see red text that displays how many notary stamps are included on the transaction – double check that the number is correct or else you will need to go back a step and make changes.
Beside the “Send” button, there is a checked box that lets the notary choose when to email document links to the first signer – this is the Email Hold feature and it is very important for preventing early signing, which is why it is automatically checked for you. See the next section for details.

Demonstration Mode:
We provide notary clients with the ability to make test transactions to practice using the system before they go live with their signers.
Demo Mode allows a notary to create a transaction with themselves and a friend or coworker playing the role of the signer.
We do not charge for Demo transactions,they are free,so you can make as many as you like to get more comfortable withthe process.
Demo Mode is set to “No” by default, so you must choose to select “Yes” when you want to use it.
When you are creating a Demo transaction, make sure you click the “Okay” button after Sending, to proceed to theZoom meeting.
We have a feature called the Email Hold which was introduced to help prevent signers from completing their documents too early, without the notary present with them on a Zoom call.
This feature is first seen on the Send screen, where it is turned on by default so that it’s always there to put you, the notary, in control of when your first signer gets the email to access and sign the documents.
If you uncheck the box, you run the risk of your signers making a mistake, so we suggest keeping it checked in most situations.
The next step in the process will explain how you can Stop the Email Hold.

Start / Schedule the Zoom Meeting
Florida notaries will see an additional option on their Send screen, to be used for specific situations where documents that the state considers "Instruments" are involved. The notary must select either “Yes” or “No” depending on what type of documents they are notarizing at the time. We have an FAQ article in our Knowledge Base that goes into detail on how this option works for Florida notaries.
When you are ready, the next step is to click on the “Send” button and the transaction will be Started and you can click “Okay” to move forward.
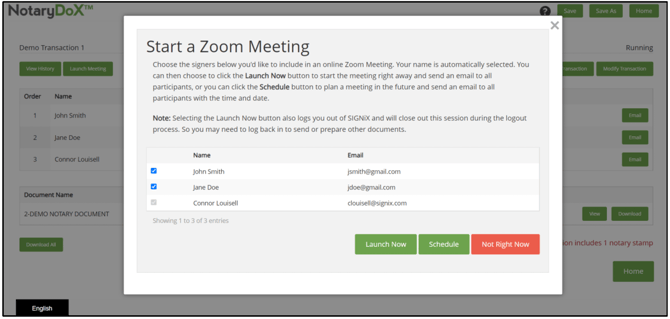
You will now be prompted to Start a Zoom Meeting.
The box will allow you to select which signers to include in the meeting, with all selected by default.
You can choose one of the following options:
- Click on “Launch Now” to be logged out of SIGNiX so that you can start the Zoom meeting immediately.
- Click on “Schedule” to choose a day and time in the future to schedule a meeting with your clients with you as the host – image on next page
- Click on “Not Right Now” if you are unsure which option you need and wish to come back to select an option at a later time.
The first two options will both send an email out to all selected signers about the meeting, either inviting them to join right away, or letting them know the day and time in the future to join the meeting later.

If you select the “Not Right Now” option for Zoom, you will be asked why you won’t be launching a meeting, with three options to choose from:
- “In-Person Transaction” is the option you can select if you are conducting a notarization in person, where you are face to face with the client, while signing online instead of on paper. This is not a very common option for notaries who are doing RON.
- “Other Remote” is the option you can select if you will be using your own personal Zoom account to schedule the meeting, or if you plan on using a different program entirely, such as Microsoft Team or Skype, for example. Clients are not forced to use our Zoom.
- “Come Back Later” is the option you can select if you don’t know when you want to start the Zoom and need some time to speak with your client before coming back into the transaction later to schedule.

If you choose to Launch the Zoom immediately, we suggest you read this section anyway to get a better understanding of the system, but you can also skip to the next section for more info about Zoom.
If you choose to either Schedule the meeting, or Come Back Later, here is some additional information about what you see afterwards.
You will be looking at the “Status” screen of the transaction that you just created, where you can see the following important details:
- The “Document Links on Hold” red text beside the “Stop Email Hold” button that you should click on only when you are ready for the first signer to start signing the documents – your first signer won’t get any email about accessing the documents at all until you click this button. Only click this button when you are absolutely ready to start signing. Clicking the button ahead of time may result in your signer being able to sign the documents without you watching on Zoom with them.
- The “View History” button at the top left where you can see every action that has taken place so far. This can be very useful to see what emails have / have not been sent out, and you can also see whether your signers have been getting errors during login or signing.
- The “Meeting Information” section at the bottom where you can choose to “Reschedule” the Zoom meeting if your client needs to change the day or time, see the “Info” about the Zoom meeting if you need to copy the link to share with someone like a witness, or “Start” the Zoom meeting if you wish – it can also be started from the email you received as the Host of the meeting.

Hosting a Zoom Meeting:
These instructions assume that you already have working knowledge of how a Zoom meeting works. If you need more info about that, please contact your Client Success Manager to discuss some additional training. You can also make some Demo transactions with a friend or coworker to practice using Zoom on your own.
How to Start the meeting:
- The “Launch Now” meeting should cause you to be logged out of SIGNiX and then you should begin to see in-browser prompts to open Zoom.
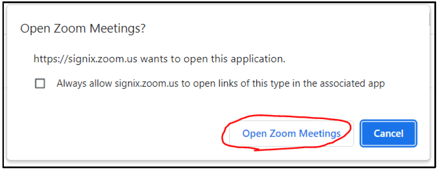
-
If you have Scheduled the meeting, you will get an email with a very long link inside, which you can click on to start the meeting at the desired time.

How to Control the meeting:
- You can Mute / Unmute yourself, as well as turn your web camera On and Off using the button at the bottom panel of the Zoom meeting window.
- You are the host, so you can Admit your signers into the meeting, or Invite them from the “Participant” button.
- You can Screenshare your computer screen with your clients, and they can share with you, using the green “Share” button in the middle of the panel.
- You can pause the recording, just don’t forget to resume recording, and you can End the meeting when you’re finished.

Signer Authentication:
Now that you have finished with Document Preparation, and you have Started the transaction and Started the Zoom meeting, you are ready to have your signer authenticated to sign the documents.
Signer authentication happens at the time of signing, not ahead of time. This is often a state requirement for RON, and it allows the notary to be present and able to help with troubleshooting common issues.
There are two main methods of Authentication that most notary clients will use for their RON signers:
- Email Only – this is for clients where you have personal knowledge of and you don’t need to verify their identity.
- KBA with ID Scan – this is for clients that you don’t know, and you are required to verify their identity before RON can proceed.
No matter which option you selected, you will need to click on the “Stop Email Hold” button on the status screen to have the system send your First Signer an email to login and access the documents.
Keep in mind that the signers must go One at a Time, in the Order they are listed on the transaction. They will not all get emails at the same time, instead only the first person will get an email then when they finish, the system will automatically email the second person, and so on, until the Notary goes last in the process.
First, we will cover what Password Only looks like for your signers.
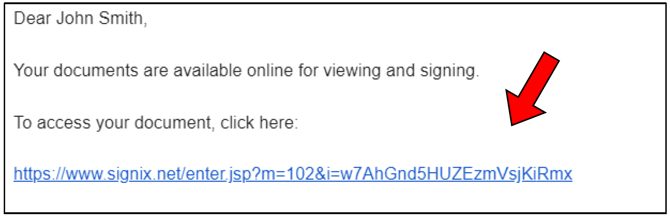
When the signer gets their email, it will look similar to the below image, and they will need to click on the link found in that email.
Signer Login - Email Only
The first screen any signer will see after clicking the link will be the Legal Consent screen. For signers with the Password Only authentication, they will get a pop-up warning to let them know not to proceed without their notary.
This is in place to help prevent early signing, so that the signer shouldn’t be moving forward without notary permission.
When the signer clicks on the “OK” button, that warning will then allow them to see the Legal Consent screen underneath.
We must ask them to accept for the purpose of capturing an e-Signature online through our system.
If the signer wants to read the full text of the Legal Consent, there is a button on the left that will bring up the details for their review.
The signer will then click “Next” to proceed after accepting.

Next, the signer will be prompted to either Create a Password, because it’s the first time they’ve used our system to sign a document. They will need to enter the password a second time to confirm it.
They will be told what to include in their password, and they should avoid using their name as part of the password. If the password is not acceptable, they will see an error message in red text on the screen.
If they have used our system before, they will instead be prompted to enter their previously created password, or they can reset it with the Forgot Password button instead.
For first time signers, they also get to choose what their e-signature will look like on the same screen where they create their password.
They can select either a default signature option, like a cursive font, or create a custom signature by drawing it with their mouse, or even upload an image.

Signer Login - KBA with ID Scan:
For Email Only signers, you can skip to the next section about Signing.
If your signer has been given the KBA with ID Scan authentication option, please continue here.
Signers who need to go through KBA will also go to their email after you have Stopped the Email Hold, and click the link they received. They will still need to click “Accept” for legal consent, then they can start the authentication process, which takes place before the password and signing the documents.
The first step of KBA for the signer is to enter the Expiration Date of their ID.
They can either type it in this format (MM/DD/YYYY) or use the calendar option to select the date manually.
Some states allow for expired IDs to be used for RON, while other states do not allow expired IDs at all. It is up to each notary to follow their own state RON laws in any given situation, including here.
If the signer enters a date that is not acceptable, they will get an error.
Otherwise, the signer will click the “Next” button to proceed to the next step.

In the above image, the signer is being asked to enter the expiration date of the ID they plan on using for the authentication process. They can type the date or select it on the calendar shown here.
Why do we ask for the ID expiration date first? To avoid wasting anyone’s time. The ID pictures are the last step of the authentication process, so it would be better to find out up front that someone has an expired ID that would not pass, rather than waste time doing the rest of KBA only to fail later. If you do not know if your state allows for the ID to be expired, please check with your secretary of state, or with another qualified agency such as the National Notary Association (NNA) or with an attorney.
After entering the expiration date, the signer will click the “Next” button and then they will see a pop-up warning to let them know not to proceed without their notary.
This is in place to help prevent early signing, so that the signer shouldn’t be moving forward without notary permission.

What happens if the signer does not have an SSN for some reason? They can also enter their ITIN which they may use for paying taxes in this country. Otherwise, the KBA process is a US based authentication process, so check with your state to see if you have additional options available.
Signer Login - KBA with ID Scan:

In the above image, the signer will need to select the “Accept” button for legal consent, and then below that they will be able to enter the last 4 digits of their SSN and their full DOB for the authentication process to start.
After the signer enters their SSN and DOB, they will click the “Next” button to move forward to the KBA Questions step of the process.
They will see several multiple-choice questions, which are created from US public information databases. The information used can go back as far as 30 years in some cases, and will include information such as cars purchased, addresses lived at, names associated with the signer, cities / states / counties born in, etc.
Signers have just a few minutes to answer the questions correctly. If they get one wrong, they will see additional questions to try again, or else they may fail this attempt at KBA. If they fail, the signer can logout with the “Quit” button at the top of the screen and start over from the link in their email.
After the signer answers the KBA questions, they will begin the Credential Analysis step of the authentication process, which involves the signer taking a picture of their ID to be verified.
The SIGNiX screen will now say “Off you go!” and then a pop-up window should appear on the screen to begin this next step.
This process should keep the signer within the browser, but they will also have the option to change to another device like their phone. We always recommend that everyone use a computer or laptop, for the best experience signing documents in the browser – no apps required.
The signer will click on the "Begin Verifying" button to start this process, which has a time limit, and should be done quickly to avoid being timed out.

Keep in mind that as the notary, you will not see these screens that your signer is seeing, because they should not yet be sharing their screen with you in Zoom, to avoid sharing sensitive information.
It is up to each notary to decide for themselves and their situation when and if the signer should screenshare with them during the RON process. State laws may vary on when a document can be recorded in the Zoom video, so we cannot advise notaries on this matter.
You as the notary can create Demo Transactions where you play the role of your signer, to see what the process is like from their perspective. This will also allow you to better direct and help your signers, if they happen to struggle with this process during the Zoom meeting with you.
The signer will be asked to select the country where their ID is from, and then the type of ID they have, such as a drivers license or passport, etc.
Next, the signer can either take a picture with the web camera on their computer, or upload a picture of the ID that is already saved to the computer, or they can move to another device like a smartphone to take the picture.
If signers use the web camera, they may need to turn off the camera in the Zoom meeting first, to allow the browser to access that camera to take the picture. If you as the notary do not want them to go off camera in the Zoom meeting, please advise them to select the option to “continue on another device” instead.

In the above image on the left, several options are shown for what type of ID the signer can choose, and they can scroll down on the menu to see even more options.
In the above image on the right, the signer has selected “Drivers License” as their ID type and are now given three options: first the green camera button to take a picture, next the “upload a photo” button, and then the “continue on another device” button that would allow the signer to move onto their phone with either an email, an SMS text message, or a QR code.
There are several detailed FAQ articles found in our Knowledge Base which cover the ID picture process.
Once the signer has taken the picture of their ID, the system will process it and try to verify the information found.
If the ID could not be verified, a message will appear to that effect, and the signer can try again to take another picture.
If the ID is successfully verified, a “congratulations” message will appear, and the signer can click on the “Done” button to return back to the SIGNiX screen where they can either create a password or enter one they have previously created. This step is the same as described in the earlier section for Email Only signers.
They will be told what to include in their password, and they should avoid using their name as part of the password. If the password is not acceptable, they will see an error message in red text on the screen.
If they have used our system before, they will instead be prompted to enter their previously created password, or they can reset it if they have forgotten.
For first time signers, they also get to choose what their e-signature will look like on the same screen. They can select either a default signature option, like a cursive font, or create a custom signature by drawing it with their mouse, or even upload an image.

Completing the Signing Process
Now that your signer has completed Authentication, they are ready to sign the document(s) you have sent them. If you need them to screen share, this would be the time to ask them to do that in the Zoom meeting.
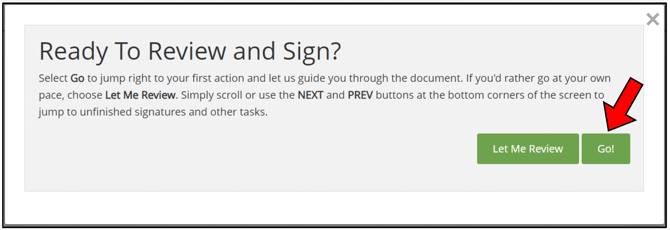
Signers are given two options when presented with the document(s):
- Let me Review – this option allows the signer to begin scrolling at the top of the first page, and sign at their leisure. They must choose to go to the next required task, or make use of the “Next” button to navigate.
- Go! – this option will bring the signer automatically to their first required action, and then as each signature is completed, the system will jump to the next action, and the next, until they are finished.
For most situations, we recommend using the “Go!” option to make signing quick and easy for the signer.
The signer should see required tasks on the document highlighted in yellow, either text boxes or checkboxes to fill in, or initials and signatures.
They must click on the blue “Sign” button to complete their signature.
If there is a date field with the signature, that will be filled in automatically once they have finished the signing process entirely, they do not need to type in the date unless the notary put text boxes there for that purpose.

If the signer tries to finish before all of their tasks are complete, the system will tell them that “You Missed Something” because they cannot leave any fields blank.
When they click the “OK” button on this message, the system will bring them to the page where something was missed so that they can complete it and then complete any remaining signatures or tasks.

When all tasks are complete, the system will prompt the signer to Finish. They must click on the “Finish” button in order to finalize everything and allow the system to move on to the next signer.

Notarizing the Documents
After the first signer finishes, the system will automatically email the next signer in the order. Each signer listed on the transaction will go through the process of authentication – according to the options selected by the notary at the beginning – and signing the document(s).
The notary will sign last in the order, after everyone else has finished.
Just like the other signers, the notary will receive an email when it becomes their turn to sign, and the notary will have a few additional steps to complete.
After clicking the link in their email, the notary will be asked to accept legal consent for e-signature, just as the other signers did.
Next, the notary will need to enter their password.
Then, if one or more signers went through KBA, then the notary will be presented with the ID picture(s) and the notary can review the images to either Pass or Fail them. This allows the notary to have the final control over whether or not the transaction is completed.

In the above image, there is a fake sample ID shown for demonstration purposes only. In a live transaction, the notary would see the true ID picture that their signer(s) uploaded for verification.
If the notary fails the ID, then the transaction will be Cancelled.
If the notary passes the ID, then they will proceed to the document(s) and they will see the same two options: Let me Review, or Go!
We still recommend using the “Go!” option to make signing quick and easy.
Just like the signers, the notary will also see all required tasks highlighted in yellow on the page. You will need to fill out every field, leaving nothing blank.
The field where the notary’s stamp was placed will appear empty for now, this is normal and expected behavior, and then the system will fill in the field with the stamp after the notary has finished signing and the transaction is Complete.

When the notary clicks on the blue “Sign” button to place their signature, they will see a prompt appear where they must enter additional information about this Notarial Act that they are performing.
This is information that the notary needs to record in their eNotary Journal. Every field must be filled in, so the notary should type in what best fits the situation, just as they would fill out their journal for a notarization on paper.

Here are the fields that this prompt requires:
- Venue – this is where the notary is located
- Fee Assessed – this is how much the notary is charging (digits only)
- Notary Act Type – this refers to what type of document is involved
- Address – this is where the Signer is located
- ID Method – the notary can select how the identity was verified (it will be selected already if KBA was used)
- Misc – this miscellaneous field is for the notary to add any extra details they might need to include per their state or notes for reference
The notary will need to select how the transaction was completed:
- In-Person (signers are physically present with the notary)
- Remote (a Zoom meeting was used to record the signing)
If there are multiple stamps on the documents in the transaction, then the notary will need to fill out this journal information for each stamp. However, the system will remember what was previously entered, so the notary can quickly make small edits and move on.
If the notary skips a field by accident, the system will give the same “you missed something” message, and then when the notary has completed all tasks, they will be prompted to Finish signing.
When finished, the notary can review the document(s), or they can download them directly by using the down arrow button at the top of the screen. We recommend downloading the signed document(s) and opening them in a PDF program such as Adobe Reader to view the validity and the stamps.
As the notary, you can end the Zoom meeting when the transaction is complete and you are finished speaking with your client(s) about the RON process that they just went through together.

The Final Steps:
The notary can download the documents from within their SIGNiX account.
After login, the notary has several options on where to download from:
- At the bottom left of the Dashboard, there is a section called “Recent Completed Transactions” where each one has a button to download all of the documents from that transaction to your computer.
- At the top right, there is a section called “Recent Updated Transactions” where the notary can click on the title of the transaction they want, to be brought to the Status screen where they can use the “Download All” button to get those documents.
- There is a button at the very top that says “Transactions” which will bring you to a list of all transactions, where you can select the one you want and proceed to the Status screen to download from there.


How to Download Documents:
In addition to downloading the signed document(s), the notary should also make a habit to regularly download the Zoom recordings and the eNotary journal to have for their own records.
SIGNiX is not a storage company, so it is up to each notary to download and store any necessary information.
On the Dashboard, there is a button at the top that says “eNotary Profile.”
The first section on the right side of the profile is for the “Recent eNotary Journal Entries” and the second is for “Recent Remote Online Recordings” – which are the Zoom meetings.

As of January 2022, the state of Florida requires the RON vendor (SIGNiX) to store the Zoom recordings for notaries. Our system is setup for this purpose, just contact us for more info.
How to Download Journal and Zoom:
Click on the “View / Download” button to see the eNotary Journal entries, you will see a list of all recent transactions, displayed about 10 per page, for the current calendar year.
You can adjust the year at the top right side of the screen, and you can download the entries as a PDF with the button at the bottom right.

When viewing the Zoom recordings, you will get a list of them all, each with its own separate Download All button for you to get the MP4 file(s).
You have the ability to create multiple Zoom meetings on a single transaction, so you can easily download all from a single transaction here.
It can take Zoom anywhere from 10 minutes to 1 hour to make the recordings available for download. You may get an email from Zoom when it is ready.

YOU HAVE NOW COMPLETED A RON TRANSACTION IN THE SIGNIX SYSTEM, CONGRATULATIONS!
Here are some additional resources for you as a user:
- Review the SIGNiX Academy where you can find training videos.
- Check out the Knowledge Base where you can search our FAQ articles.
- Subscribe to the Status Page and see if there are any known issues.
- Open a Support Ticket with our team with this form or email us directly: CustomerSupport@signix.com and we will get back to you as soon as we can during weekly business hours, or the next business day.
- Contact our Billing department for invoicing questions: Billing@signix.com
- For independent notaries who want to start marketing their RON business to potential clients, here are some helpful tips to get you started.