We have made a new feature available for some, but not all, notary clients to be able to upload their own individual digital certificates. This feature is first being rolled out to notaries in the state of Kentucky, and we will announce future changes as they become available.
Please note: This feature is for the Digital Certificate for signing documents, which is not to be confused with a notary / notarial certificate, notary license, a notary stamp / seal, nor any other type of documentation that the client may have.
This is a very specific product which notaries can purchase from third party vendors. Please contact your Sales Representative for more information.
For the purposes of this article, it is assumed that the notary has already exported and prepared their own digital certificate from a third-party provider onto their Windows computer.
IMPORTANT: This process is currently only compatible with Windows computers.
Those with an Apple computer, such as a MacBook, will not be able to upload their certificate into SIGNiX at this time. We hope to have this addressed in the future.
Steps to follow:
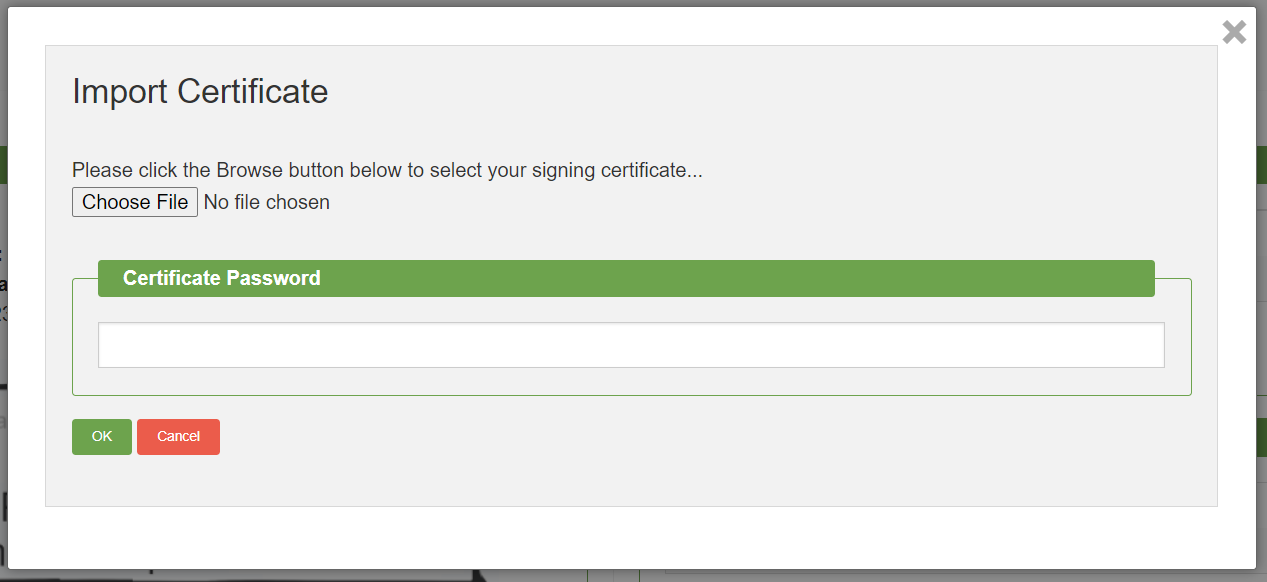
On the eNotary Profile screen, there is a new button at the bottom left that says "Import Certificate" and clicking on that button will pull up a window.

The window that appears will have a "Choose File" button to allow the notary to search for the digital certificate file on their computer.
It should be in PFX format and must already include the private key.
Once the file has been selected, the notary must type in the Password for the key file, which was created when the file was originally exported by the notary.
You must know your digital certificate password, not only to import it but also to sign documents with it going forward.
Do not lose your password, it cannot be easily reset as it is integral to your digital certificate.
If you forgot the password, you will likely need to reach out to the company where you purchased the certificate from to discuss getting a new certificate issued in order to create a new password. Then you will need to remove the old certificate from your eNotary Profile and import the new one with the new password.
The notary will click the "OK" button once these two actions are complete.
The screen will now display the expiration of the new digital certificate, and a “Remove Certificate” button is now shown on the screen. This is your indication that the certificate and key has been imported successfully.
It will be up to the notary to update their certificate as needed.
Going forward, SIGNiX will automatically use the notary’s individual key and certificate to sign notarial transactions. The process to create new transactions will remain the same. The notary will still add signers, documents, signatures and seals the same way as before.
In order to properly tell the system that you need to use your own digital certificate, you must add yourself as a signer to the transaction by checking both the "I am the Signer" checkbox and the "Notary" checkbox. You must select both, even if you are just signing the document, not placing a notary stamp.
This detail is important for Texas notaries, who may need to update their state each time their digital certificate is renewed, with a document that only requires a signature not a stamp. The notary must still check both boxes for this to work, or else the system will default back to the SIGNiX digital certificate if it thinks you're doing regular e-signature.
The notary’s clients will see no difference in the authentication process, and no difference while signing documents. The only change will occur when the notary is signing the documents.
The notary will enter their SIGNiX Password after consenting to the transaction, click to sign, then enter the notarial information for the journal.
After clicking the Finish button in the Finish Signing dialog, the notary will then be prompted with an “Intent to Sign” dialog where they must enter the password for their digital certificate key file – not their SIGNiX password.
Again, this will be the same Password from the Import step earlier, so it is extremely important that the notary remember this new Password.
The system will finish processing the signatures, and once it is completed, the notary will be able to download the signed document as normal. The individual digital certificate is being applied to the notary's signature, not the other signers on the document - those other signatures will have the SIGNiX digital certificate.
The notary, and others who will be needing to view the signed documents, may need to adjust their Adobe Reader settings to accept their new individual certificate. We have instructions on how to do this found here: How to have Adobe trust your Notary-Owned Individual Digital Certificate
For technical questions, please contact: CustomerSupport@signix.com